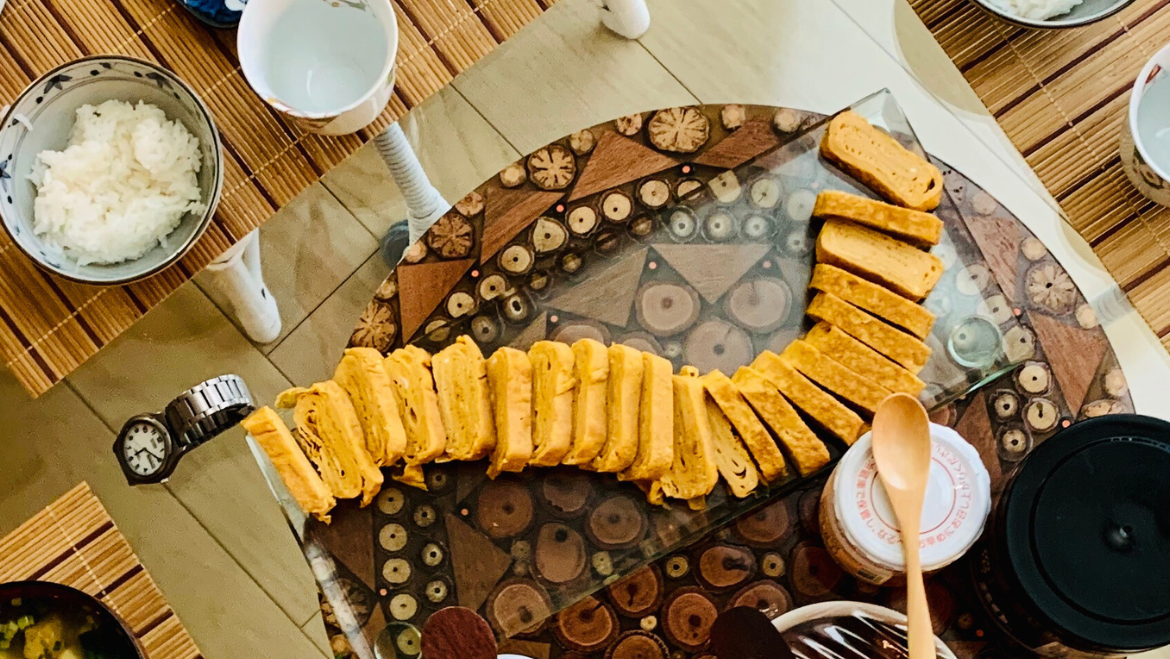

Photo Credit: Obaachan's Tamagoyaki submitted by Emi Sasagawa
For Asian Heritage Month, we’ve invited our staff and students to share their most cherished Asian recipes along with the captivating stories behind them.
From timeless family traditions to comforting dishes for unwinding, food serves as a powerful medium for embracing diversity, expressing our heritage, and bridging cultural gaps. Join us in exploring the delightful recipes our staff and students have generously shared, and delve into the rich tapestry of Asian culinary!


Photo Credit: Wikimedia Commons, HOME MADE PULAO MUTTON, by Moumita das21, 2021
Mutton Pulao
Ahad Zafar, Arts Service Centre Student Support
It’s a recipe my grandmother used to cook for me as a child living in Karachi. It’s not the most well-known recipe from Pakistan (usually Biryani, Nihari, or Butter Chicken are the common ones), but it is a hearty and relaxing meal that really encapsulates family life. Fun fact–Mutton refers to goat meat in South Asia rather than sheep!
Ingredients - Broth:
- 3 cups water
- 1 lb Goat meat (cut into small 2" cubes)
- 1/2 yellow onion, chopped
- 1/2 tbsp cumin seeds
- 1/2 tbsp coriander seeds
- 1/2 tbsp black peppercorn
- 1 two-inch cinammon stick
- 1 dried bay leaf (optional)
- 3 green cardamom pods (cracked open slightly)
- 4 whole cloves
- 2 tsp salt
Ingredients - Pulao:
- 1 1/2 cups long grain basmati rice (washed before cooking)
- 1/4 cup vegetable oil
- 2 tbsp unsalted butter/ghee
- 1 yellow onion - sliced thinly
- 1 tsp cumin seeds
- 1/2 tsp whole black peppercorns
- 4 whole cloves
- 5 garlic cloves (crushed or finely chopped)
- 1 inch fresh ginger (crushed or finely chopped)
- 1/2 tsp salt
- 2 Thai green chili pepper (any decent available chili is fine if you can't find this)
- 2 tbsp plain yoghurt
Directions - Broth:
- Place large pot over medium heat
- Add all ingredients listed under broth
- Bring water to a boil
- Once water is boiling, reduce heat to a simmer
- Cook for 90 minutes-2hours, until the meat is extremely tender
- Turn off the heat and remove all the meat from the broth using tongs
- Strain the broth and discard the onion and whole spices
- Broth should be at around 2 3/4 cups, if not then add hot water til it reaches that level
Directions - Pulao:
- Heat oil in a medium-large pot
- Add onions and fry until golden brown
- Add whole spices, garlic and ginger and sauté for a couple of minutes
- Raise the heat a little to medium high, add the meat and cook for 1-2 minutes
- Add salt, green chilli, yoghurt and fry for another 2-3 minutes, until the oil starts to separate
- Add the broth and bring to a boil
- Add the rice and stir, bring to a boil again
- Reduce heat to medium once the rice starts boiling and cover partially
- Allow rice to simmer for 5 minutes without stirring, should see little wells of water on the surface
- Once you see those wells, wrap a kitchen cloth underneath the pot lid and pull it over the handle, this traps more steam in the pot
- Reduce heat to low and cook for 15 minutes
- Turn heat off and leave it to rest for another 15 minutes
- Sprinkle garnishing on top and it's done, I usually serve it with cucumber raita but plain yoghurt also works


Photo Credit: Masala Chai submitted by Chhaya Guarang Rana
Ayurvedik Masala Chai (mixed-spice tea)
Chhaya Guarang Rana, English Language and Literatures Reception and Administrative Support
This recipe holds a deeply cherished place in my heart because it was a regular drink in my childhood home in India. Whenever anyone in the family, including myself, battled a throat infection or caught a cold, my grandmother and mother would lovingly brew a pot of this Ayurvedik masala chai.
The familiar scent of the spices simmering in the kitchen would signal comfort and healing. As I sipped the warm, aromatic tea, I could feel its soothing effects on my throat and the warmth spreading through my body, easing my discomfort.
Those moments gathered around a steaming cup of masala chai weren’t just about combating illness; they were about the care and love that went into each preparation. It was a tradition passed down through generations, a ritual of nurturing both body and spirit during times of need.
This recipe is special to me not only for its taste and health benefits but also for the memories it evokes—the warmth of family, the healing touch of tradition, and the comfort of home. Ayurvedik masala chai is a delicious and aromatic tea infused with traditional Ayurvedik spices known for their health benefits.
Ingredients:
- 2 cups water
- 2 cups milk (you can use dairy or non-dairy milk like almond milk)
- 2-3 tsp black tea leaves (Assam or Darjeeling works well)
- 1-inch piece of fresh ginger, peeled and sliced
- 4-5 whole green cardamom pods, lightly crushed
- 4-5 whole cloves
- 1 inch cinnamon stick
- 4-5 black peppers
- 1-2 tsp loose dried or fresh holy basil (tulsi) leaves (optional)
- Sweetener of your choice (white sugar, brown sugar etc. but the rock sugar is the best. Rock Sugar is tiny, crystal, unrefined form of sugar.)
Directions:
- In a saucepan, combine water, ginger slices, cardamom pods, cloves, cinnamon stick, black peppers, and holy basil leaves (if using). Bring the mixture to a boil.
- Once the water boils, lower the heat and let the spices simmer in the water for about 5-7 minutes. This allows the flavours to infuse into the water.
- Pour in the milk and bring the mixture to a gentle boil. Be careful not to let it boil over.
- Add black tea powder to the saucepan and let it simmer for an additional 1-2 minutes. Adjust the simmering time based on how strong you like your tea.
- Once the chai reaches a boil, reduce the heat and let it simmer for another 2-3 minutes. Stir occasionally to prevent the milk from sticking to the bottom of the pan.
- Remove the chai from heat and strain it using a fine mesh strainer or a tea filter.
- Add sweetener of your choice to the strained chai, stirring until it dissolves.
Serve hot and enjoy your homemade Ayurvedic masala chai!
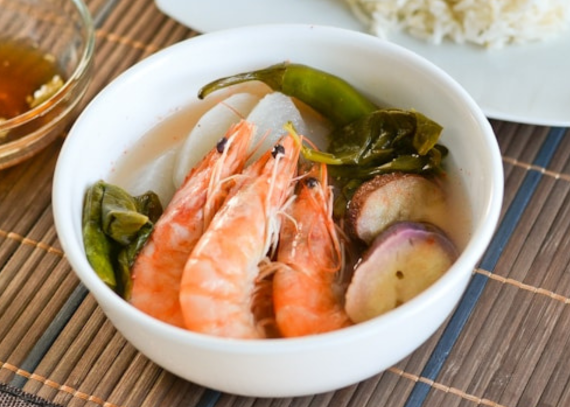

Photo credit: Salu Salo Recipes by Liza Agbanlog
Sinigang-Na-Hipon
Katya Roxas, Arts Communications Communications Manager
Sinigang is a sour soup native to the Philippines, using tamarind paste. What makes it special is that it can be customized based on what’s available in the market—from vegetables to protein. I grew up eating Sinigang almost every week with some siling labuyo (wild chilli) and patis (fish sauce) on the side. On rainy days or special occasions, Sinigang is served as a side dish that can be poured over rice and enjoyed with other types of food on the table. Regardless of time or place, this recipe is very dear to me because it has notes of comforting spices from my Lolo’s (grandfather) experimenting in the kitchen, and a warm hug from my mom when I’d become ill as a kid. Sinigang was all about coming together as a family, finding comfort in each other’s presence, and learning to do the best with what we have. Since moving away from my family, Sinigang has been my dose of home. Whether it’s a cold winter night, a long day at work, falling ill, or just needing a taste of nostalgia, a spoonful of Sinigang brings me closer to the comfort of my childhood home every time.
Ingredients:
- 1 lb Shrimp, cleaned
- 22 grams Knorr Sinigang Sampaloc Mix
- 1 bunch kangkong or bok choy
- 10 snake beans, chopped into 2 inch pieces
- 6 pieces of Okra
- 1 eggplant, sliced
- 1 cup Daikon radish, sliced
- 1 tomato, sliced
- 4 long green peppers
- 1 white onion, chopped
- 2 quarts water
- Fish sauce (I usually add 1.5 tbsp) and ground pepper to taste
Directions:
- Boil water in a cooking pot. Add onion, tomato, and radish. Cover and continue to boil for 8 minutes.
- Add the shrimp and cook for 2 minutes.
- Lower the heat to medium
- Add Knorr Sinigang Sampaloc Mix. Stir until it dilutes completely. Cover and cook for 3 minutes.
- Add the long green pepper, snake beans, okra, and eggplant. Stir all together and cook for 8 to 12 minutes.
- Put the kangkong stalks into the pot. Season with fish salt and ground black pepper.
- Add kangkong leaves or bok choy. Cook for 1 minute or until the vegetables are vibrant.
- Transfer to a serving bowl with all the good bits. Serve warm with rice and a saucer of fish sauce and siling labuyo on the side.
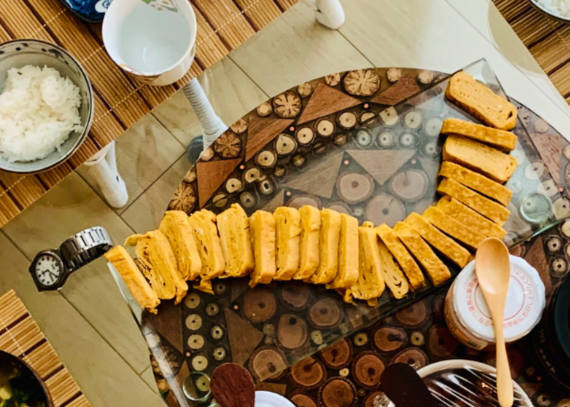

Photo Credit: Obaachan’s Tamagoyaki submitted by Emi Sasagawa
Obaachan’s Tamagoyaki
Emi Sasagawa, Arts Communications Director of Communications
I grew up far away from my extended family, so we only saw my paternal grandparents every two years. Whenever we visited, my parents forced my sister and I to wake up early to have breakfast with ojiichan and obaachan before they started work at the family’s tatami factory. I loved obaachan’s version of tamagoyaki, with its savoury, fishy, fermented notes.
Ingredients:
- 4 eggs
- 1 tbsp soy sauce
- 1 tbsp mirin
- 1 tsp hondashi
- cooking oil as needed
Directions:
- Beat 4 eggs well in a bowl using chopsticks
- Add one tablespoon each of soy sauce and mirin, and one teaspoon of hondashi.
- Put a small amount of cooking oil in your pan and bring it up to medium heat.
- Add a small amount of your egg mix into the heated pan. Once the egg has cooked slightly so that the top is still slightly uncooked, push it over to the side of your pan, rolling the egg onto itself.
- Add more of the mixture and repeat the same process.
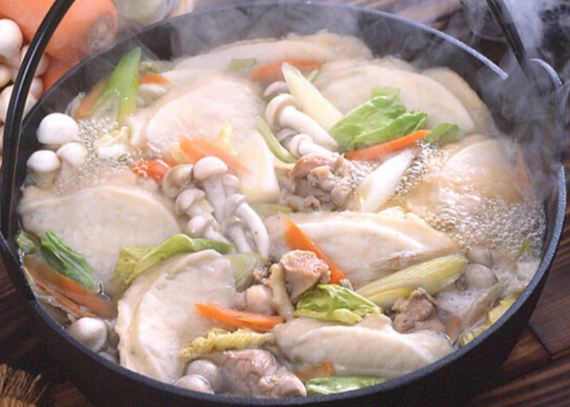

Photo Credit: Senbei-jiru submitted by Ren Akagi
Senbei-jiru
Ren Akagi, Geography Student
Senbei-jiru, or せんべい汁 in Japanese, is a country-style dish from Hachinohe in the Nanbu region of Aomori prefecture in Japan, where my mom is from. I, myself, grew up in Tokyo, which is surrounded by sky-scrapers and numerous infrastructures, however, whenever I go visit my grandmother in Hachinohe, she always makes us this Senbei-jiru, which reminds me of the serine ocean by 10-minutes walk, the gentle Nanbu accent and the precious time we share to have a meal together, which I took for granted until my grandmother got sick.
Now I am here in Vancouver, and my grandmother has a problem with her knee and cannot cook as easily as she used to, Senbei-jiru is not just a soup for me anymore; it is a connection to my roots, my family, and the memories we have built together. Even though I am far from home, every spoon of Senbei-jiru brings me back to those moments of warmth and love.
Ingredients (two servings):
- 8 Senbei crackers
- 200 grams of chicken (breast or thigh)
- Seasonal vegetables and mountain vegetables (Here we used ½ gobo, ½ carrot, 5g of dried shiitake mushroom)
- 1 stalk of green onion
- 80 grams of Ito-konnyaku
- 1 liter of water
- Soy sauce to taste
- Salt/Sake to taste
Directions:
- Cut the chicken into small pieces. If using gobo, thinly slice it. Cut the carrots into thin strips and soak the dried shiitake in water. Chop the green onion and cut the ito-konnyaku into 3-4 cm strips.
(Tip: Chicken can be substituted with canned mackerel, grilled mackerel or salmon. It is recommended to add ingredients that can be found in Hachinohe such as seafood.) - Sauté the meat until browned.
- Boil the water in a pot. Add the vegetables, mountain vegetables, and ito-kyonnaku. Simmer in low heat.
- Turn the heat to high. Skim off the scum that rises to the surface of the water. Add soy sauce, sake, and season to taste with salt.
(Tip: Don’t skim off the oil from the broth.) - Break the senbei into three or four pieces and add to the soup with the green onion.
(Tip: Only add the amount of senbei that will get eaten right away. Add the senbei when the broth is boiling and turn off the heat when it reaches the desired firmness.)


Photo Credit: Flickr, Aunt Lay Leong’s 萝卜糕 Savoury Radish Cake by Alpha, 2009
Lo Bak Go
Laura Chan, Development and Alumni Engagement Events Manager
Most of my favourite memories are somehow connected to food. Mostly sharing meals with the people that mean the most to me. Dim sum, specifically, is so nostalgic it is also easily my favourite thing to eat in the whole world. So, when the pandemic started not only was I starving for dim sum I was also starving for connection and those happy memories. I decided to take it upon myself to learn how to make my favourite dim sum recipes… which is easier said than done. This recipe was my first success. Let me tell you–being able to make Lo Bak Go in April of 2020 was life changing. I’ve since mastered other dim sum recipes but this one in particular has become very special to me (it’s also so easy to make!).
Ingredients:
- 20 ounces daikon radish (grated)
- 1 to 1 1/2 cups water
- vegetable oil
- 1 tbsp dried shrimp (washed, soaked and chopped)
- 3-5 dried shiitake mushrooms (washed, soaked, and chopped)
- 1 Chinese sausage (diced)
- 1 scallion (chopped)
- 1 1/4 cups rice flour
- 1 tbsp cornstarch
- ½ tsp salt (or more to taste)
- ½ tsp sugar
- white pepper (to taste)
- Oyster sauce (for dipping, optional)
Directions:
- Add the grated turnip and 1 cup of water to a wok or large pan, and bring to a simmer. Simmer for about 10 minutes, stirring occasionally so the turnip does not brown. The turnip will produce liquid, some of which will evaporate. You will have liquid left in the wok with the radish that you will also use. Scoop the cooked turnip into a large mixing bowl to cool. Pour any remaining liquid in the wok into a measuring cup, and add water until you have a total of 1 cup of liquid. Add it to the mixing bowl with the cooked turnip.
- Clean your wok or pan and place it over medium heat. Add a couple tablespoons oil. Add the shrimp, mushrooms, and sausage, and cook for about 5 minutes. Stir in the chopped scallion and remove from the heat to cool.
- Add rice flour, cornstarch, salt, sugar, and white pepper to the mixing bowl with the radish and cooking liquid. Mix well until the dry ingredients are well-incorporated. Add in the cooked shrimp, mushrooms and sausage, and be sure to scrape the oil from the pan into the batter. If you like your radish cake soft, you can add another 1/4 cup or more of boiling water to the batter. If you feel the batter is too thin, return it to the wok on low heat to thicken the batter while stirring. Mix well and let sit for 15 minutes.
- Give the batter a final stir, and pour it into a well-oiled loaf pan. Place the pan into a steamer with plenty of water and steam over medium-high heat for 50 minutes.
- Remove the pan from the steamer and let your turnip cake set for about 30 minutes. Once cooled, loosen the sides with a spatula and turn it out onto a cutting board. It should come out quite easily.
- Use a sharp knife dipped in water to slice ½-inch thick pieces. I know people who’d enjoy it just like that, but most people pan-fry the turnip cake first. Add a couple tablespoons oil to a non-stick or seasoned cast iron pan over medium heat. Fry the cakes on both sides until golden and crispy. Serve with oyster sauce!
Note: You can also make this turnip cake in advance, refrigerate it in the loaf pan, and slice/fry later. If you’ve refrigerated turnip cakes that you’ve already fried, the best way to reheat them is to re-fry them in a pan.
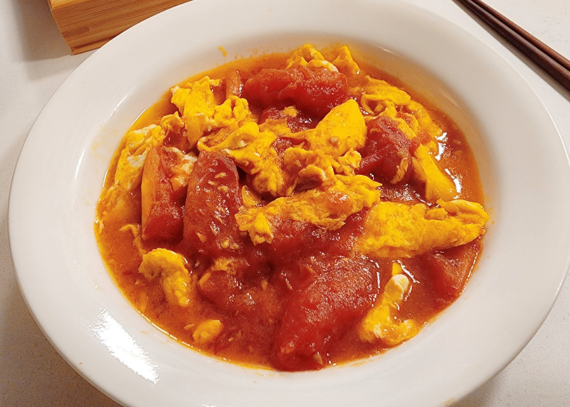

Photo Credit: Tomato and Egg Stir-Fry submitted by Michelle Ho
Tomato and Egg Stir-Fry
Michelle Ho, Arts Communications Communications and Design Strategist
Tomato and egg stir-fry is my all-time favourite dish. Every time I take a bite, my taste buds dance with joy. My parents always tell me I used to be a picky eater, and this was one of the rare dishes that I’d enjoy without creating a fuss. Now that I think about it, my mom never shared her recipe with me, but I learned it by heart since I was always by her side and eager to take a bite whenever she made it. In a world that is constantly changing, it’s nice to have a dish that remains a constant source of comfort.
I love pairing this dish with fluffy white rice, but there are other recipes to enjoy the dish differently. Some people prefer to have it as a topping for mixed noodles, and others enjoy it as a noodle soup.
Ingredients:
- 3-4 medium tomatoes
- 4 eggs
- 1 chopped scallion (recommended but optional)
- 5 slices of ginger
- 3 cloves of minced garlic
- 2 tablespoons of cooking oil
- A pinch of salt
- A pinch of white pepper
- 1 tbsp of oyster sauce or soy sauce
- 1/2 tsp of brown sugar
- 1/3 cup of water
- 1 teaspoon sesame oil
Directions:
- Crack eggs into a medium bowl and sprinkle salt and pepper. Beat until smooth and let it sit.
- Prepare sauce by pre-mixing oyster sauce, sugar, and water in a bowl. Also let that sit.
- Heat a tablespoon of oil in a frying pan over medium-high heat. Add the eggs and stir frequently until they are lightly cooked but still runny. Pour the eggs into a bowl and wipe out the pan.
- Add another tablespoon of oil to the frying pan. Add ginger and let it soak in the oil. Fry briefly before adding garlic and the white parts of the scallion. Cook until fragrant (it only takes a few seconds)
- Add tomatoes and sauce mixture to the frying pan and cook until the tomatoes soften.
- Pour in the cooked eggs and stir to combine. Add salt to taste if needed, and finish with sesame oil.
- Garnish with green onions, and enjoy!


